Pumps
Vacuum Pump Troubleshooting and Maintenance Guide
November 8, 2024
Technical Team
Technical Guide

Article Summary
Complete guide to diagnosing and repairing common vacuum pump issues including inadequate vacuum, pressure problems, and excessive noise.
# Vacuum Pump Troubleshooting and Maintenance Guide
## Technical Overview and Specifications
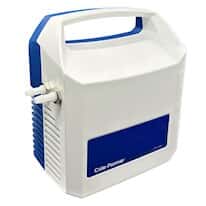
Cole-Parmer vacuum pumps, including the AIR ADMIRAL VPS-200 series and oil-less diaphragm models, are essential laboratory instruments designed for reliable vacuum generation. These pumps typically operate with:
- **Ultimate Vacuum**: Up to 28" Hg (95 kPa)
- **Flow Rate**: 1-10 CFM depending on model
- **Power Requirements**: 115V/230V AC, 50/60 Hz
- **Motor Type**: Brushless DC or AC induction
- **Operating Temperature**: 10°C to 40°C ambient
## Safety Warnings and Precautions
⚠️ **ELECTRICAL HAZARDS**
- Always disconnect power before maintenance
- Ensure proper grounding of electrical connections
- Never operate with damaged power cords
- Use appropriate PPE including safety glasses
⚠️ **THERMAL HAZARDS**
- Allow pump to cool completely before service
- Motor surfaces can reach 60°C during operation
- Maintain minimum 6-inch clearance for ventilation
⚠️ **CHEMICAL HAZARDS**
- Ensure compatibility of pumped gases with pump materials
- Never pump flammable or explosive vapors without proper safeguards
- Use appropriate ventilation when pumping chemical vapors
## Common Failure Modes and Diagnostic Procedures
### 1. Inadequate Vacuum Performance
**Symptoms:**
- Unable to reach specified ultimate vacuum
- Slow pump-down times
- Gradual vacuum loss over time
**Diagnostic Steps:**
1. Check for external leaks using leak detection spray
2. Verify inlet filter condition and replace if clogged
3. Test pump performance with known leak-tight system
4. Monitor pump current draw (should be within 10% of nameplate)
### 2. Excessive Noise and Vibration
**Symptoms:**
- Unusual grinding, squealing, or knocking sounds
- Excessive vibration during operation
- Intermittent noise patterns
**Diagnostic Steps:**
1. Isolate pump from system and test noise levels
2. Check mounting bolts for proper torque (25-30 ft-lbs)
3. Inspect cooling fan for damage or obstruction
4. Verify proper belt tension (1/2" deflection for belt-driven models)
### 3. Motor and Electrical Issues
**Symptoms:**
- Pump fails to start or trips circuit breaker
- Intermittent operation or speed variations
- Excessive current draw
**Diagnostic Steps:**
1. Measure supply voltage at motor terminals (±10% of rated voltage)
2. Check motor windings for continuity and insulation resistance
3. Verify capacitor condition with capacitance meter
4. Test thermal overload protection reset functionality
## Detailed Step-by-Step Repair Procedures
### Filter Replacement Procedure
**Required Tools:** Phillips screwdriver, replacement filter element
1. **Power Down**: Disconnect electrical power and allow 30-minute cool-down
2. **Access Filter**: Remove inlet connection and filter housing cover
3. **Document Position**: Note filter orientation before removal
4. **Remove Filter**: Carefully extract old filter element
5. **Inspect Housing**: Check for debris or damage in filter chamber
6. **Install New Filter**: Insert replacement ensuring proper seating
7. **Reassemble**: Replace cover with proper gasket alignment
8. **Test Operation**: Reconnect power and verify normal operation
### Diaphragm Replacement (Oil-less Models)
**Required Tools:** Socket wrench set, torque wrench, diaphragm kit
1. **System Preparation**
- Disconnect power and inlet/outlet connections
- Remove pump from mounting bracket
- Clean external surfaces
2. **Disassembly**
- Remove pump head bolts in star pattern
- Lift pump head carefully to avoid damaging gasket surfaces
- Document diaphragm position and orientation
3. **Diaphragm Inspection and Replacement**
- Check old diaphragm for cracks, tears, or permanent deformation
- Clean all mating surfaces with isopropyl alcohol
- Install new diaphragm ensuring proper alignment with guide pins
- Apply thin layer of approved gasket compound if specified
4. **Reassembly**
- Replace pump head with new gasket
- Torque head bolts to specification (15-20 ft-lbs) in star pattern
- Reconnect all fittings with appropriate thread sealant
5. **Performance Verification**
- Perform initial start with reduced load
- Monitor for unusual noise or vibration
- Conduct full vacuum performance test
## Preventive Maintenance Schedule
### Every 500 Operating Hours (or 6 months)
- **Inlet Filter**: Inspect and clean or replace as needed
- **Cooling System**: Clean fan blades and air passages
- **Electrical Connections**: Check for corrosion or looseness
- **Vibration Check**: Verify mounting hardware torque
- **Performance Test**: Document vacuum level and pump-down time
### Annual Maintenance
- **Complete Disassembly**: Full inspection of all internal components
- **Wear Component Replacement**: Diaphragms, valve plates, gaskets
- **Electrical Testing**: Insulation resistance and motor current analysis
- **Calibration Verification**: Confirm vacuum gauge accuracy
- **Documentation Update**: Record all maintenance activities
### Professional Service Recommendations
**When to Contact Professional Service:**
- Motor winding failures requiring specialized rewinding equipment
- Precision machining needs for custom applications
- Hazardous material contamination requiring specialized cleanup
- Warranty work requiring authorized service centers
**Service Documentation Requirements:**
- Complete maintenance history and performance records
- Operating environment conditions and application details
- Failure mode description with timeline
- Previous repair attempts and results
**Authorized Service Centers:**
Contact Cole-Parmer technical support at 1-800-323-4340 for nearest authorized service facility.
Need Additional Support?
If you're experiencing issues not covered in this guide, our technical team is here to help.
Contact Technical Support